Laravel Package Development: A Technical Step-by-step Guide
Are you a Laravel enthusiast ready to take your skill set up a notch? Then why not learn how to create packages for the framework? If that sounds interesting, then this tutorial is what you need.
If you’ve already created some great apps with this impressive framework, why not enter the world of creating reusable code or even packages for exploring new possibilities in development? All it takes is 7 simple steps, and we will guide you through each one, so let’s get started!
Read this tutorial to get a better understanding of the Laravel Package Development services process in simple steps.
Laravel eCommerce Package Development in 7 Simple Steps
-
Create a new folder for Laravel eCommerce Package First
Install Laravel on your PC for your new project.
Following the installation, you must create a new folder within the root of your app.
Then, within packages, we will create a folder with the name of our provider or company. So in my situation, I’ll use LaravelWizard.
Then, within that folder, we’ll make another folder called **calculator** to house our package.
Finally, we will create a folder called ‘src,’ where the code for our package will live.
As a result, the structure of our folder will be ‘packages/LaravelWizard/calculator/src.‘
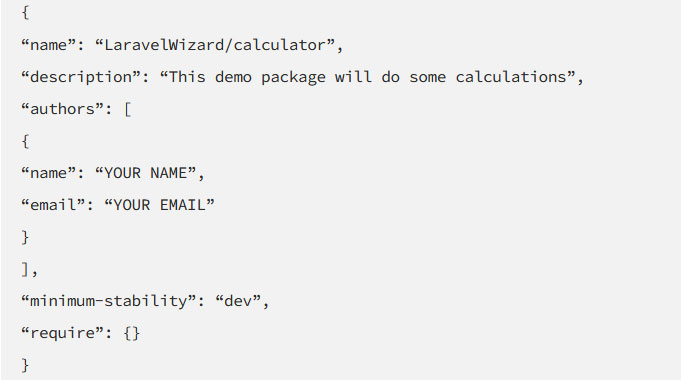
Now that we have our folders ready let’s name our package in our project by creating a ‘composer.json’ file.
-
Name the package and initialize it with a composer.
Navigate to the folder containing your package name in your command prompt. In our case, navigate to ‘packages/LaravelWizard/calculator’ and execute the following command:
composer init
This will initialize the current folders as a composer package and prompt you with questions to finalize your package’s configuration. Following this procedure, you will have a new file named “composer.json” in your package folder.
Don’t worry if you don’t know the answers to any questions during the initialization process; press enter to skip them, and you may add or amend them afterward.
The composer.json file will resemble the example shown below.
What is composer.json?
Composer.json is a configuration file that describes your application, data, and needs. It is inserted in the root directory of all PHP files.
-
Load the package from the composer.json
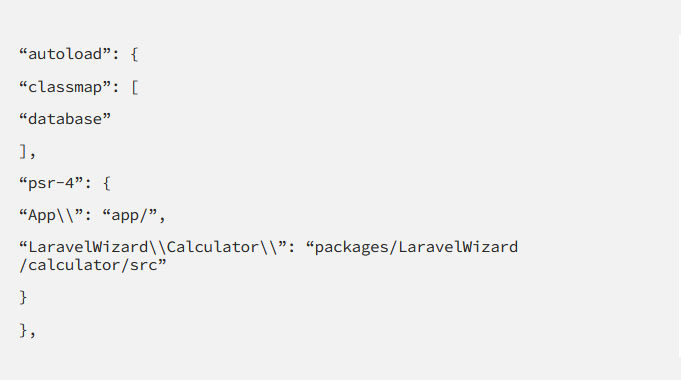
Every Laravel application includes a composer.json file in the app’s root directory. This is your primary application composer file, where we define all of our app dependencies.
Let’s use the ‘PSR-4’ autoload block to autoload our newly created package:
The composer must then autoload the autoloader and our package. To accomplish this, we execute the following command:
composer dump-autoload
And then run the following command to optimise the class loader (not always needed)
php artisan optimise
-
Add our package service provider
The service provider is the primary entrance point within our package. This is the location where our package is loaded or booted. Let’s create our ServiceProvider in the root of our project using an artisan command via the command line:
php artisan make: provider CalculatorServiceProvider
This will result in creating a new file called ‘app/Providers/CalculatorServiceProvider.php.’
Let’s put this in our package folder, so it’s at ‘packages/LaravelWizard/calculator/src/CalculatorServiceProvider.php.’
Remember to modify your namespace to your `Vendor\Package name.`
As you can see, we have two methods in our new Service Provider class: boot() and register(). The ‘boot()’ method initiates any routes, event listeners, or other functionality you choose to include in your package. To bind any classes or functionality into the app container, employ the register ()’ method. In the next stage, we’ll learn more about these.
Next, in our config/app.php, add our new Service Provider to the ‘providers[]’ array:
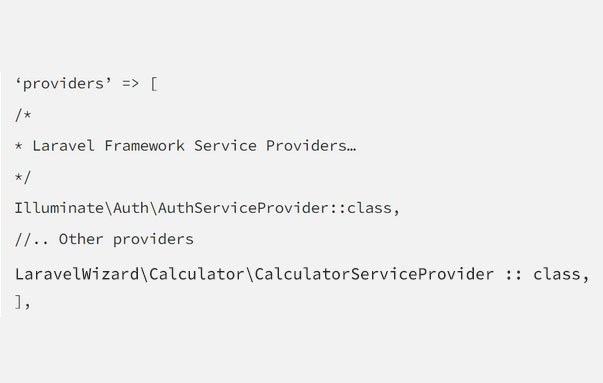
Our service provider has been activated, and our package is ready to use. But we don’t currently have any functionality. Let’s start by creating a routes file for our package.
-
Add your package routes.php file
To begin, create a new ‘routes.php’ file in our package src directory and add the following code:
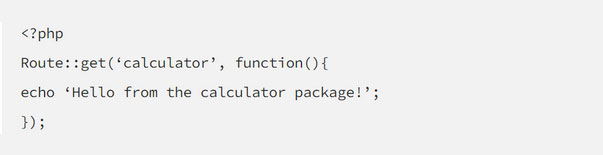
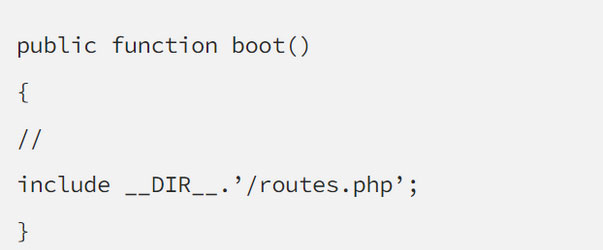
Then, inside our Service Provider’s ‘boot()’ method, include our routes.php file:
And now, let’s fire up our Laravel app and navigate to the ‘/calculator’ route. I’m using php artisan serve, so I can access my calculator at ‘http://localhost:8000/’.
-
Creating our package controller.
Let’s make a new controller by using the artisan command:
php artisan make: controller CalculatorController
Then, instead of putting it in ‘app/Http/Controllers/CalculatorController.php,’ put it in ‘packages/LaravelWizard/calculator/src/CalculatorController.php’.
Inside this controller, I will then create two methods, ‘add()’ and ‘subtract(),’ such that the file contents appear like this:
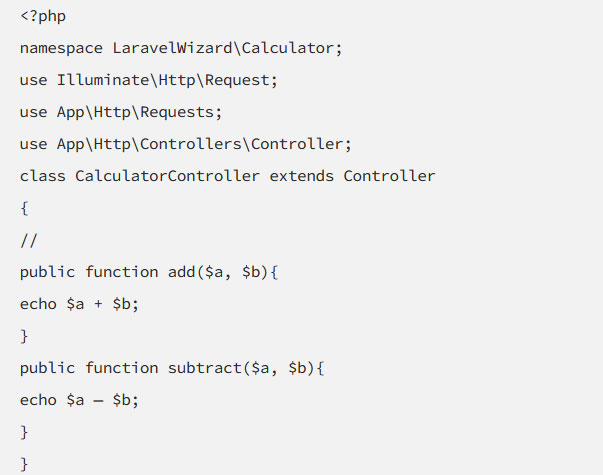
Remember to alter your namespace in your controller above to `vendor\Package_name.’
Also, keep in mind that we must include the following:
So that our controller knows which Controller class to extend from, use App\Http\Controllers\Controller
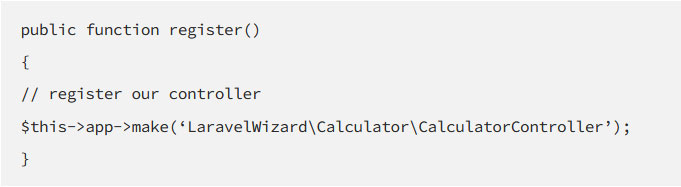
We’ll need to register our controller now that we’ve created it. To register our new controller, we will add the following code to our Service Provider class’s register() method:
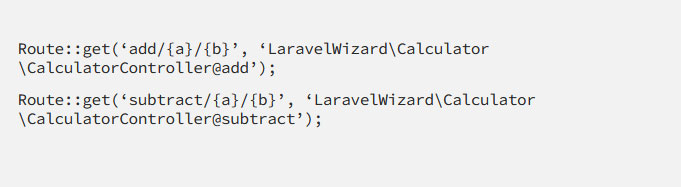
Finally, add the following routes to our ‘routes.php’ file:
What if we wanted to load a couple of views from our laravel eCommerce package? That’s simple enough. Let’s get started with that in the following stages.
-
Adding views for our package.
Let’s make a new folder named views within our package src folder. Then, create a new file and name it ‘add.blade.php.’ Let’s put the following code inside ‘add.blade.php’:

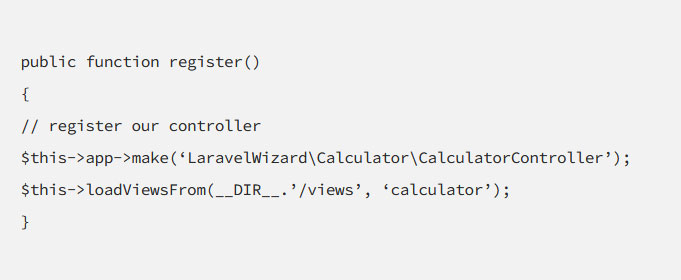
Next, let us register where these views should be loaded by adding the following code to our Service Provider’s register method:
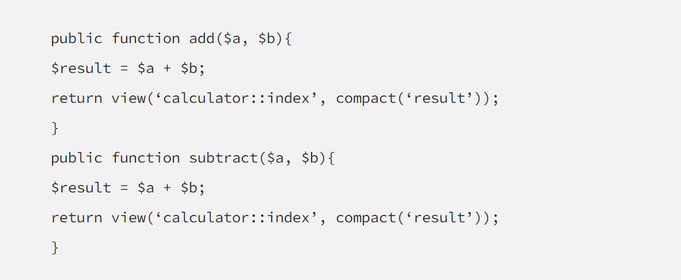
Finally, alter the ‘add()’ and ‘subtract()’ functions of our Calculator controller to call this view:
And there you have it!
This is how you may create a custom Laravel package or your packages for your Laravel application step by step.
Conclusion
So, in 7 stages, you discover how to build a Laravel package. Creating a custom Laravel package is a simple procedure if you follow the instructions at each step.
We employ these packages and create custom Laravel development services and web solutions for our clients as a leading Laravel web development services provider in the USA. We have an in-house staff of skilled Laravel web developers. Discuss the requirements of your next Laravel project and contact our experts for top-notch Laravel development services today.